It’s ironic. Twice in the last month I’ve held off on working on a post until Friday, when I am off from work, and can take some pictures of my projects in daylight, which is supposed to be the best light. Both times, it rained all Friday long, and was almost as dark at points as it is when I come home from work.
Oh well. On to the project.
I was so annoyed by my embossing failure on this card that, even though I’m supposed to be on a buying moratorium, I went online and ordered a variety of different embossing powders, to see how they worked. Maybe the Stampendous powder I buy at Michaels just isn’t very good. I bought a couple different brands in the colors I use most — black, white, clear and gold.
Black — Tsukineko Imagine and Ranger
White — Zing Opaque White and Wow! White Pearl
Clear — Judikins Clear Detail and Hero Arts Ultra Fine Detail
Gold — Zing and Hero Arts
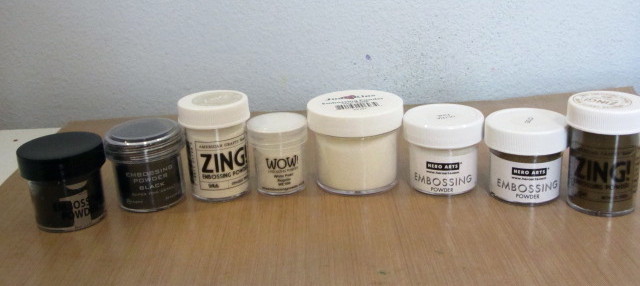
I compared them as well to what I already had, which was Stampendous Clear, Midnight Black, Detail Gold, and Martha Stewart Antique Gold. (I think that’s what it’s called, it’s been a while since I bought it. Maybe Florentine Gold, I don’t remember and it doesn’t say on the bottle.)
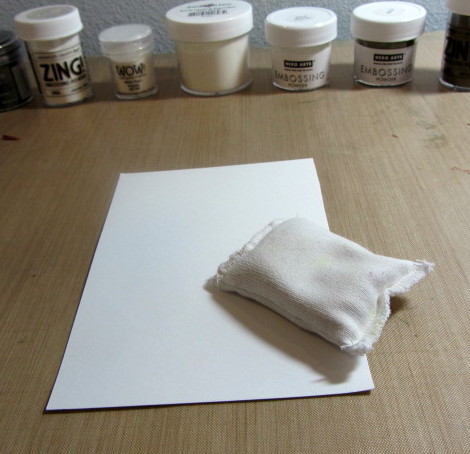
I cut up some scrap cardstock to try them out, and chose two stamps — a Recollections starfish, for a solid image, and Hero Arts’ Nightflower, for a fine line image.
I tried to follow good technique, as well, to do the best job with each powder — I dusted each page with my Embossing Buddy to minimize static cling:
and I used Versamark ink for each sample, which is good embossing ink, so each powder would have a good base to cling to.
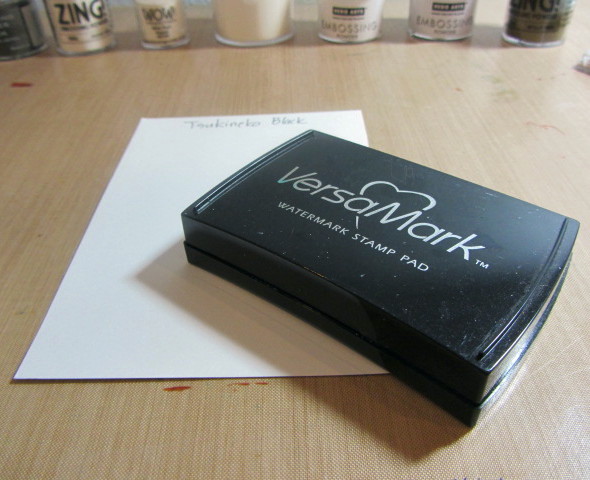
For the pictures I took, I just used the Autocorrect feature of my photo software, so each image would be treated the same and not excessively manipulated.
Black Powder:
Tsukineko Imagine Black

This powder is OK, I think. I don’t think the coverage on the starfish is great — it’s pretty, hm, bubbly, or rumpled. But the detail on the Nightflower image is good.
Ranger Black Super Fine

The coverage and the detail are good on this one, better than the Tsukineko I think, but what I don’t like is how much of the stray powder scattered around and stained the cardstock away from the image, as you can see between the starfish and the flower. Even when I used the Embossing Buddy. I supposed you can attribute that to user error, but I was as careful with this sample as I was with the rest, and even when I blew the stray powder away, it still stained the paper. Very annoying.
Stampendous Midnight Black

This is the powder whose shoddy results inspired me to conduct this experiment. And rightly so — the results here are genuinely bad. Both images are only partially embossed — the rest of the image is only a blurry, flat black line where the powder either sunk into the paper, or blew away upon application of the heat gun, leaving only enough embossing to color the paper. You can see it better in this close-up of the flower:
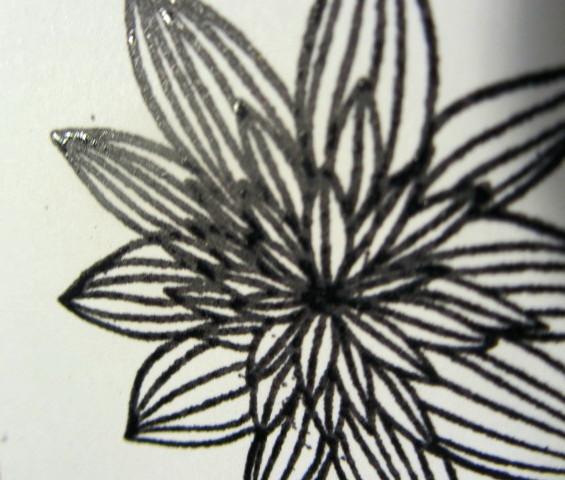
The light hits the embossed parts, and the rest — which is most of the image — is flat and dull.
You can also see the very uneven coverage on the starfish as well:

No wonder I have been getting such bad results!
White Powder
Zing Opaque Finish White
This powder is unusual in that it is very coarse, far coarser that the other powders we are working with here:

Not coarse enough to be called UTEE though. I wonder how it will affect the results.

I think it looks good. Coverage on the starfish is good, it’s bright and opaque. But the detail on the lines of the Nightflower is also good. I like it. No stray powder elsewhere on the cardstock.
Here’s a close-up:

Wow White Pearl Regular
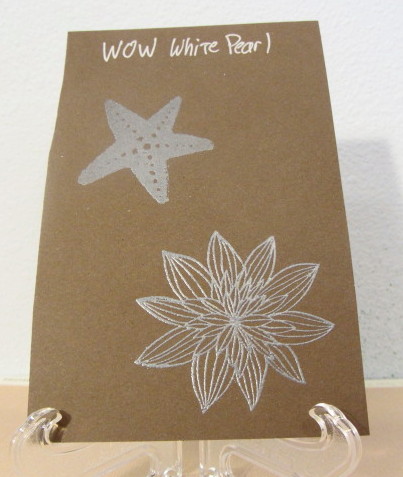
This was a surprise. Although it’s called “White Pearl,” and the powder looks white in the jar, when embossed, it definitely comes out silver, as you can see. Didn’t expect that. It’s interesting, but it sure ain’t white. So much for that.
Clear Powder
On these samples I have sponged some ink over the embossed images, so you can see them better.
Judikins Clear Detail
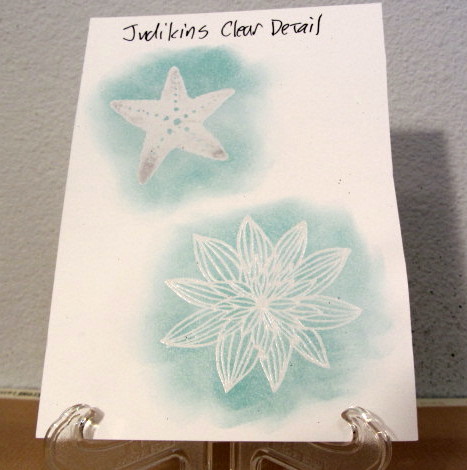
(Sorry, this was the first sample I made and my starfish stamp was dirty.)
All in all I think this is pretty good, good coverage on the star and good detail on the flower. No complaints.
Hero Arts Ultra Fine Clear
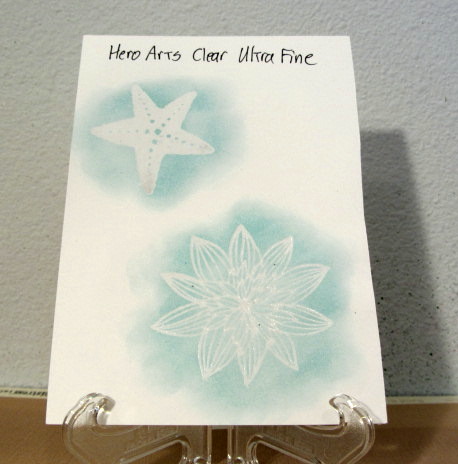
Good coverage on the starfish, but for an “ultra fine” powder, I think the lines on the flower look a little burry. I think I like the Judikins better.
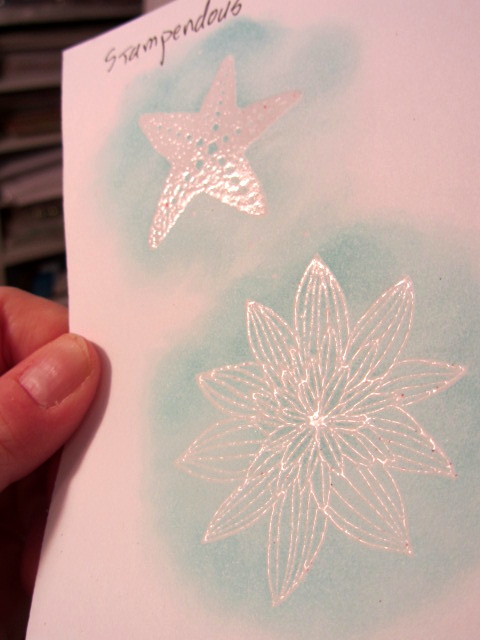
Stampendous

This has both better coverage and better detail than the Stampendous black powder which was so unsatisfactory above. I’m surprised. I like it better than the Hero Arts, even. Hm.
Here’s a close-up. It is also shinier than the Hero Arts powder.
Gold Powder
Zing Metallic Gold

I quite like how bright, shiny, and golden this powder looks. But I am disappointed in the lack — indeed the opposite — of detail on the flower. Many of the lines are blurred completely together.
You can see this better in close-up, particularly in the center and bottom right:

Hero Arts

This gold embossing powder has a soft, almost frosted finish and color that I quite like. It is not as brassy as the Zing. But again, I am disappointed in the lack of detail on the Nightflower.
Stampendous Detail Gold

This is not good. it is an ugly, yellowish color, not shiny, and for a “detail” powder, it is very blurry and pebbled both on the stafish and the flower. Very displeased.
Martha Stewart
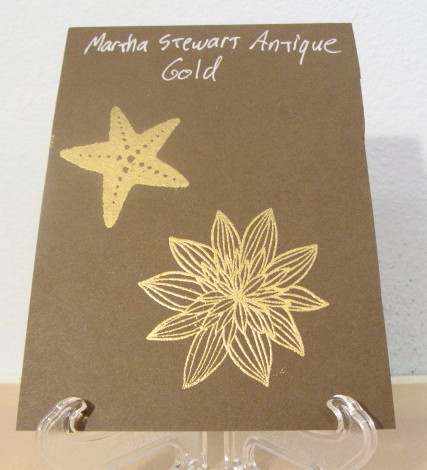
I am quite pleased by the detail offered by this powder. Look how clear the lines on the Nightflower are. But comparing it to some of the others, I don’t quite like the brassy, yellowish color. Not that shiny, but an unpleasant yellow. Maybe I should try mixing this and the Zing powder together and see what I get.
Here is a close-up, and you can see both how finely detailed it is, and the almost jaundiced yellow color.

Results
So, brand to brand, the Stampendous did not come off well, with two of the three Stampendous powders I have performing poorly. The Hero Arts did not come off as well as I expected from such a premium brand, lacking detail on both samples — although I do like the unusual soft color of the gold powder. Of the brands in which I have more than one sample, I think I like the Zing best overall, both samples having good coverage and bright color.
The WOW White Pearl powder also has good coverage and detail, but the color is hardly as advertised, so I might be leery of buying any other WOW powders. The Ranger and Tsukineko are OK.
Colorwise, for the gold, I don’t really have a favorite. I like the Zing for its shininess, the Hero Arts for its unusual color, and the Martha Stewart for its detail. I will just have to be careful and use them each for different things.
For white, it would have to be the Zing, as the WOW powder is — not white. I do think the Zing is quite bright and white.
For the clear, I like the Judikins best. The Stampendous clear performed better than the other Stampendous colors, but I won’t be running out to buy any more.
For the black, I wasn’t thrilled with any of them. But if I had to pick one, it would be the Ranger, although I am displeased with how much stray powder ended upon the sample. One would just have to be extra, extra careful with it. Black embossing is just problematical.
I notice, also, that whether a powder is “fine detail” or not doesn’t actually seem to represent how well it will perform on that front.
The upshot is, I threw out the Stampendous powders. They only cost me a few bucks, I’ve had them forever, and they are noticeably inferior to the other brands. Why keep them around when I have better options?
I hope this little experiment helps some people. I know I learned a lot. Heat embossing is so cool and fun, we always want to do it, but we see here that the results you get can vary widely. And even a small jar of powder lasts for a long time. It’s worth it to experiment a little to find a powder you are happy with, I think. I hope I have given you some guidance on that front.
UPDATE DECEMBER 2015: Since writing this post, I no longer heat-emboss with black powder at all. It just doesn’t give good results, and isn’t worth the trouble. When I want black embossing now, I stamp with black pigment ink and emboss with clear powder. The ink I use to stamp is VersaFine Onyx Black — an oil-based pigment ink that stamps really dark black and is very crisp and detailed, good for sentiments. Embossing with clear powder means you don’t have to worry about stray black specks getting embossed accidentally onto your project either. Just a much better way to do it. I recommend it.